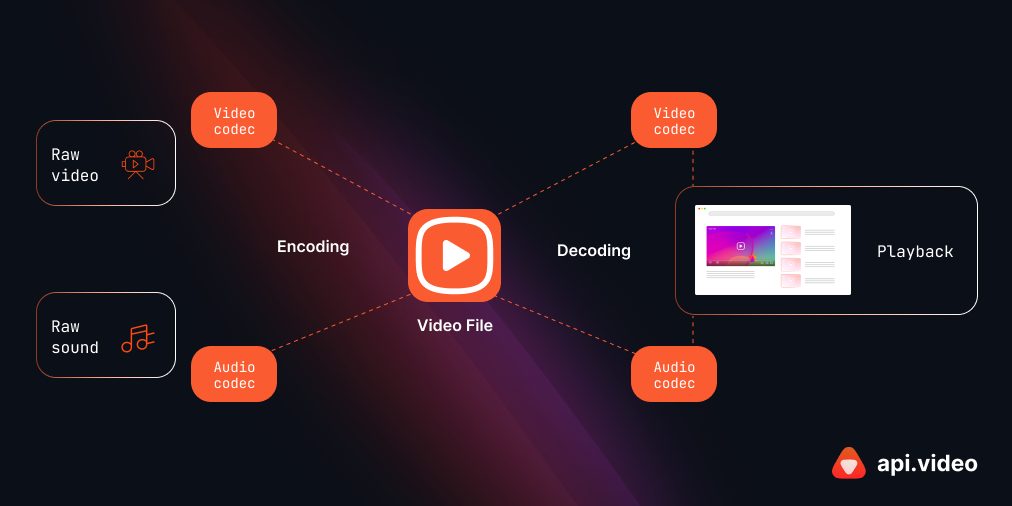
”How to make the video size smaller?”, ”How to change format of video?”, ”How to convert video?”, ”How to change the resolution or frame rate of a video?” those and similar questions have one simple answer: video encoding (transcoding or even converting sometimes).
Sometimes when you render your video the output file is not what you want. It’s too big (no 10GB for a one minute Full HD video is not normal), it’s in a different format than I need etc. The video editing software sometimes doesn’t have enough options for the output file or we just for some reason don’t want to adjust the settings in order to achieve our goal in rendering itself (even though it’s highly recommended to do so when rendering, the information below can help you with that as well). Or even our camera produces a different format than we want to have. The solution is quite simple. By the way I won’t talk about details here, you can find additional information by yourself.
Software
For video encoding we need a proper software. There are really many on the Internet. Some are simple where you can just select some preset profile for the conversion like ”Video for YouTube” or ”Video for iPhone” and just hit convert button. I personally don’t like this cause I wanna know what’s going on behind the scenes ^_^”. For such simple encoding use software like Freemake Video Converter, Any Video Converter or WinFF. (there are much more actually) But if you want to adjust (well you can do it in the previous ones as well but…) your settings more it’s better to use pieces like MediaCoder or SUPER (be careful during the installation though, it tends to offer you some malware stuff). On Linux the best one is ffmpeg or avconv that you can use from the console (really almost an almighty tools) or Handbrake if you need a GUI.
Codec and container
But what to do with the settings? Well first we need to know what do we actually desire and find out some info about that. For example I upload videos on YouTube, therefore I check out the recommended settings for YouTube videos (link here). First thing to set in our program is usually the container, in other words the file extension like AVI, MP4, MPEG etc. Again you have to find out some info about it before deciding. Here again on YT we can see that they recommend us MP4 format. Which one you chose usually depends on compatibility you need or combination with the second parameter called compression format.
There are tons of video coding formats with many advantages and disadvantages. When you take a look at the link for YT video format you can see that for example here is mentioned H.264 which is very popular one by the way. You can look for some comparsions and tables. Your choice usually depends on how fast the coding into this format is vs how small the video can be without any visible loss of the quality (or if you need for some reason, you can look for lossless formats which will however produce quite a big file).
There is also a thig called codec. Codec is a program used for coding and decoding the video in a specific data format. Sometimes people call the video format metioned above as a codec. Codecs again differ especially in the speed of coding/decoding. There are standards made for the video formats and codecs are actually independent implementations of those standards.
Scale
Then we have other settings here. Video scale/size is basically the amount of pixels in your video. Well just imagine your video and it’s just as it sounds, the size measured in pixels. Full HD for example has 1920 x 1080. Larger means better quality, smaller means lesser quality. Be careful, if you have a video for example 640 x 480 and you convert it to 1920 x 1080 you will not get a better quality!!!! You will increase the size of course but where is the computer supposed to get the missing pixels? It will just clone the surrounding ones or somehow interpolate so basically you will just have the same video stretched to the new size.
Frame rate
Frame rate is the amount of frames (as you surely know video can be described as a sequence of static pictures played in a high speed so your eyes take it as a smooth movement) that are played in one second. Again, when you have 30 fps video and convert it to 60 fps you will just get clones of the frames and larger video with no reason or benefit. 25 fps is good enough to trick your brain, 30 is better and 60 is almost useless. You can see the difference between 30 and 60 if you have both next to each other but it depends on which one you prefer. To me 60 fps videos look like a soap opera shows. (actually there is a lot of interesting theories why 60 fps videos look unnatural to some people, check them out) Sometimes you can choose especially while rendering the video if you want progressive scan (each frame is full) or interlaced (you have always half of the new frame and half of the previous interlaced together. For a smoother playback use progressive.
Bit rate!!!
And now the most important thing. Bit rate, usually in kbps. Now imagine a metal pipe and water flowing through it. Each particle of the water carries a part of information. This pipe is connected to a barrel with water. When you make the pipe’s diameter larger, more water will flow, thus more information you’ll get. Smaller means less information. This is the bitrate! It’s the mount of data sent to your video stream per second. That means bigger bitrate = better quality, smaller bitrate = lesser quality. Again, it’s useless to convert 1000 bitrate video to 2000 bitrate video, you already should know why. Here it’s good to experiment a bit. Try to use some bitrates for your videos and watch the change of the quality. For example for Full HD videos people always use from 8000 to 10 000 kbps. Uncompressed videos usually has such a big size because of extremely high bitrate. This element is the key thing in video encoding. Find a good bitrate for your videos and the victory is yours!!!
Just imagine a FullHD video. That’s 1920*1080 pixels multiplied by for example 30 FPS. Each pixel has three color channels RGB (sometimes also Alpha for transparency) and each channel is 8 bit. Multiply that all together and you’ll see how much data you need to send to the video in order to make it play smoothly. Fortunately there is a thing called compression.
Audio
You can usually set audio format as well. It’s almost the same. Just less options. Sampling frequency is used to reduce continuous signal to the discrete one. Basically make from for example continuous sinusoid the array of vertices with the same values as the sinusoid at the same places/times. Higher is better but be careful, very high SF can ruin your sound and add some artifacts. And again another parameter is bitrate which you already know. Sometimes you can set channels. If you choose 1, you’ll have mono sound (all the speakers will produce the same result), 2 means stereo (two speakers equals different sounds to make it sound more like it’s all around you) or nowadays you can see 5.1 (six speakers basically, useless unless you have this 5.1 speakers set).
As I said this article is very brief but this is enough for you to be able to encode your videos the way you want. See ya…
I experiment a lot with the encoding etc. What I found to be a good approach is to render the video from Blender in a high quality and then encode it with ffmpeg to h.265 with mkv container. For the sound (you can use some simple crf ffmpeg settings where you can avoid manual bitrate typing) If you don’t want to lose the quality in the Blender export, you can try exporting asi an image sequence (JPEG 2000 is optimal) and then merge it with the audio track separately exported in ffmpeg. One of the advantages is also that when you make a mistake, you can simply rerender only the frames that are wrong. The folder with the images will be quite big so be sure you have enough of free space on your hard drive. For the audio I stick to the aac format.
